Service Discovery
What is Service Discovery?
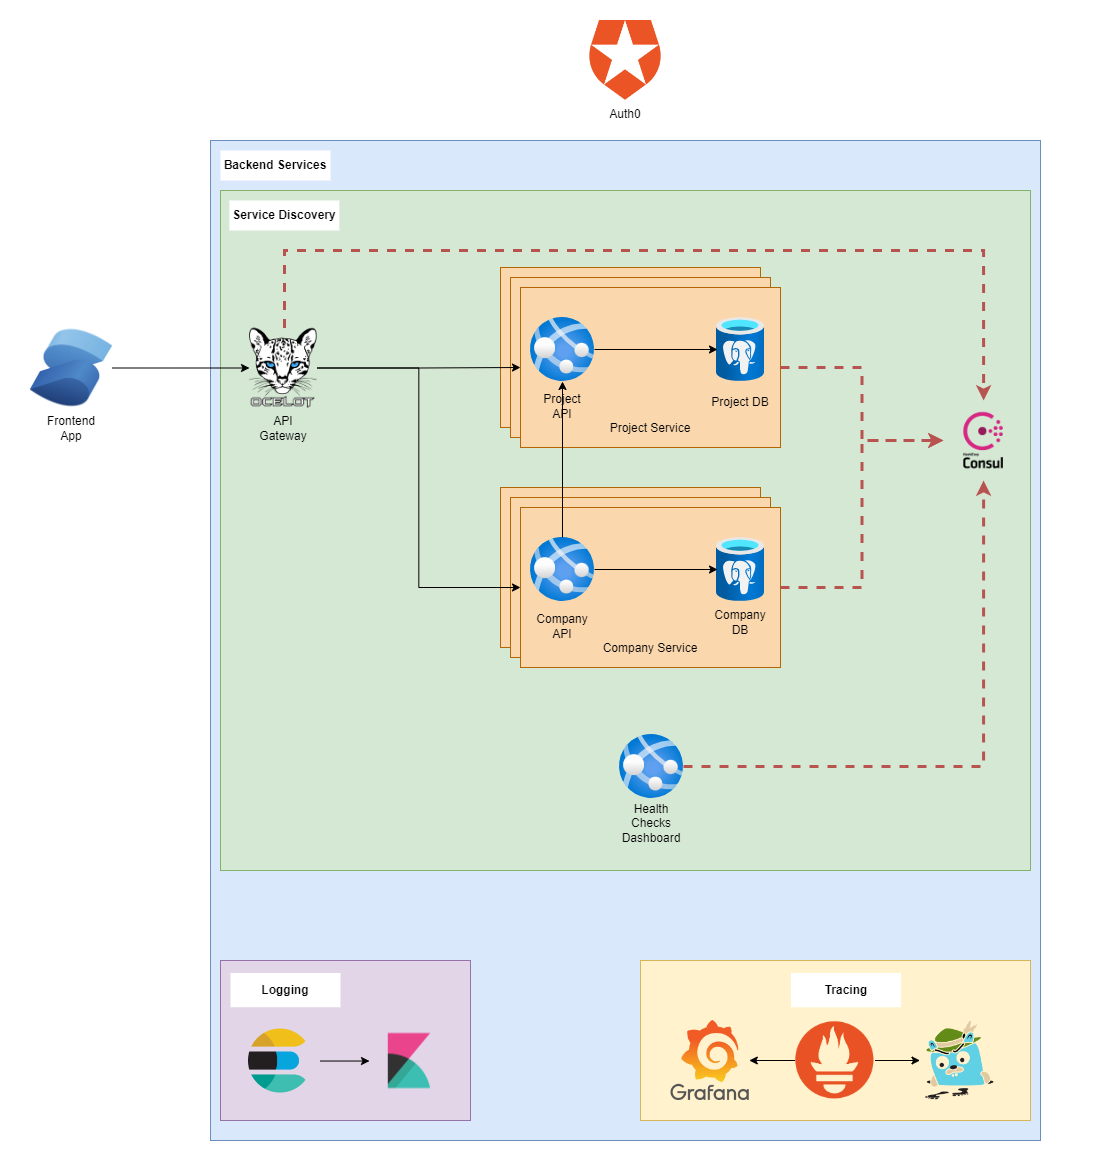
Service discovery is an essential aspect of modern distributed systems. It refers to the ability of services to automatically discover and communicate with other services in the same infrastructure. In a microservices architecture, where services are often dynamic and can be deployed or scaled independently, service discovery enables seamless interaction and coordination between services.
Why Use Consul for Service Discovery?
Consul is a widely adopted service discovery tool that provides a robust solution for service registration, discovery, and health monitoring. It offers several features that make it a popular choice:
- Dynamic Service Discovery: Consul allows services to register themselves and automatically discover other services using DNS or HTTP-based APIs.
- Health Checking: Consul performs regular health checks on services to ensure that only healthy instances are available for routing traffic.
- Service Catalog: Consul provides a centralized catalog of services, making it easier to discover and consume services across different environments.
- Key-Value Store: Consul includes a distributed key-value store, which can be used to store configuration data and other metadata.
- Multi-Datacenter Support: Consul supports multi-datacenter deployments, allowing services to span across different geographical regions.
- Consul Connect: Consul Connect enables secure service-to-service communication with automatic encryption and authorization.
ACL
ACL stands for Access Control List. In the context of Consul, ACL refers to the Access Control List feature provided by Consul to manage authentication and authorization for accessing Consul resources.
Consul ACL allows you to define fine-grained access policies that control who can perform specific actions on various resources within the Consul cluster. These resources can include services, nodes, key-value (KV) pairs, events, and more. ACLs are defined using policies and tokens.
Policies
Consul policies provide a way to control access and permissions within the Consul cluster. Policies define a set of rules that govern what actions are allowed or denied for specific resources in Consul. Resources can include services, nodes, key-value (KV) pairs, and more.
Policies are defined using HashiCorp Configuration Language (HCL) and can be created, modified, and assigned to users and tokens. With policies, you can enforce fine-grained access control to restrict or allow actions based on various conditions, such as service names, datacenter locations, or specific nodes.
Example
# policy.hcl

# Define a policy named "kv-read-only" that allows read access to the KV store
# and denies write, delete, and management actions.

# Specify the policy rules
policy "kv-read-only" {
  # Rule to allow read access to the KV store
  resource "kv/*" {
    policy = "read"
  }

  # Rule to deny write access to the KV store
  deny {
    actions = ["kv/write", "kv/delete", "kv/management"]
  }
}
Tokens
Consul tokens are used to authenticate and authorize access to Consul resources. Tokens act as credentials that allow clients to interact with the Consul API. When a client sends a request to Consul, it includes a token to authenticate and authorize the action. Tokens can be associated with policies to control the level of access and permissions granted to the client.
Consul provides different types of tokens, including management tokens, agent tokens, and client tokens. Management tokens have the highest level of privileges and are typically used for administrative tasks like configuring Consul or creating policies. Agent tokens are used by Consul agents to communicate with the cluster and perform actions on behalf of services. Client tokens are issued to end-user applications and have limited permissions based on the associated policies.
Key-Value (KV) Store
Consul includes a distributed key-value (KV) store, which allows you to store and retrieve arbitrary data. The KV store is a powerful feature that can be used for dynamic configuration, service discovery, and other use cases. Data in the KV store is organized hierarchically, similar to a file system, with each key having a corresponding value.
The KV store can be accessed through the Consul API, and clients can read, write, and delete data using Consul's key-value endpoints. Each key-value entry can also have associated metadata and can be watched for changes. This allows applications to react to updates in real-time and implement dynamic behavior based on the changes in the KV store.
The Consul KV store is often used to store configuration parameters, feature flags, or any other data that needs to be shared across services in the Consul cluster. It provides a centralized and distributed data store that can be easily accessed and synchronized by applications and services.
By leveraging Consul policies, tokens, and the KV store, you can establish secure access control mechanisms and store dynamic data for your applications and services within the Consul ecosystem.
Example
config/
  └── database/
      ├── host
      ├── port
      ├── username
      └── password
To store the database connection configuration, you can set the values for each key using the Consul API or CLI. Here's an example using the Consul CLI:
consul kv put config/database/host 127.0.0.1
consul kv put config/database/port 3306
consul kv put config/database/username myuser
consul kv put config/database/password mypassword
This creates a set of key-value pairs in the KV store under the config/database/ path. Each key represents a specific configuration parameter (e.g., host, port, username, password), and the corresponding value represents the value for that parameter.
The stored data can be retrieved using the Consul API or CLI as well. For example, to get the value of the host key:
consul kv get config/database/host
Setup
Install Locally
To install Consul, follow these steps:
- Visit the Consul website: https://www.consul.io.
- Download the appropriate version of Consul for your operating system.
- Extract the downloaded package to a directory of your choice.
Configuration
Consul can be configured using a configuration file in either JSON or HCL format. Create a new file, e.g., config/config.hcl, and define your configuration options there. Here's an example configuration to get you started:
log_level  = "INFO"
server     = true
datacenter = "az-1"
node_name  = "consul-server-1"

ui_config {
  enabled = true
}

leave_on_terminate = true
data_dir           = "/consul/data"

client_addr    = "0.0.0.0"
bind_addr      = "127.0.0.1"
advertise_addr = "127.0.0.1"

ports {
  http  = 8500
  https = 8501
}

bootstrap_expect = 1

acl = {
  enabled        = false,
  default_policy = "deny",
  down_policy    = "extend-cache",
  tokens         = {
    agent = "ba7a565d-9aa6-2753-d8bb-6258403dbcae"
  }
}

connect = {
  enabled = true
}
In this configuration:
- log_level: Sets the log level to "INFO".
- server: Specifies that this instance of Consul is a server node.
- datacenter: Specifies the name of the datacenter as "az-1".
- node_name: Specifies the name of the Consul server node as "consul-server-1".
- ui_config: Enables the Consul Web UI.
- leave_on_terminate: Configures Consul to gracefully leave the cluster when terminated.
- data_dir: Specifies the directory where Consul will store its data as "/consul/data".
- client_addr: Sets the client address to "0.0.0.0" to listen on all available network interfaces.
- bind_addr: Sets the bind address to "127.0.0.1".
- advertise_addr: Sets the advertise address to "127.0.0.1".
- ports: Specifies the ports used by Consul, with HTTP on port 8500 and HTTPS on port 8501.
- bootstrap_expect: Sets the number of server nodes expected during the bootstrap process to 1.
- acl: Configures Consul's Access Control List (ACL) settings. In this example, ACL is disabled.
- connect: Enables Consul Connect for secure service-to-service communication.
Starting Consul
To start Consul, open a terminal or command prompt, navigate to the directory where Consul is installed, and run the following command:
consul agent -config-file=config/config.hcl
This command starts the Consul agent using the configuration file you created. You should see output indicating that Consul has successfully started and joined the cluster.
You can now access the Consul Web UI by opening a browser and navigating to http://localhost:8500. The Web UI provides a user-friendly interface to explore and manage the Consul cluster.
Install Using Docker + Powershell
Run the setup-consul.ps1 script under docker folder from powershell.
The script will perform the following steps:
- Replace the subnet IP in the server1.json, server2.json, and server3.json files. This ensures that other docker services can communicate via the same network.
- Start the Consul containers using Docker Compose.
- Copy the ACL configuration file (consul-acl.json) to the Consul servers.
- Restart the Consul servers to apply the ACL configuration.
- Bootstrap the ACL to generate an ACL token.
- Set the agent token for each Consul server.
- Output the generated ACL token.
- The generated ACL token will be stored in the $tokenResult variable.
Install Using Helm/K8s + Powershell
Helm is a package manager for Kubernetes that simplifies the deployment and management of applications. It allows you to define, install, and upgrade applications in a consistent and reproducible manner. Helm uses charts, which are packages that contain all the resources and configuration necessary to run an application on Kubernetes.
Run the setup-consul.ps1 script under k8s folder from powershell.
- The script starts by updating the Helm repository to ensure the latest charts are available.
- It then uses the helm install command to deploy Consul using the hashicorp/consul chart.
- The --create-namespace flag creates the namespace named "consul" if it doesn't already exist.
- The --namespace consul flag specifies the namespace in which to install Consul.
- The --values values.yaml flag points to a separate values file for custom configuration.
- After the installation is complete, the script retrieves the bootstrap ACL token from the generated Kubernetes secret named consul-bootstrap-acl-token and decodes it.
- Finally, the script sets the variable $tokenResult to the decoded token value.
The values.yaml file contains the configuration values specific to the Consul Helm chart. Here are some key configurations in the provided example:
- global: Defines global configurations for Consul, such as the name and TLS settings.
- connectInject: Enables Consul Connect injection for sidecar proxy integration.
- client: Configures the Consul client settings, including the update strategy for rolling updates.
- server: Configures the Consul server settings, such as the number of replicas, bootstrap expectations, and disruption budget.
-
ui: Enables the Consul UI and configures the service settings, including the service type and ports.
-
By modifying the values in the values.yaml file, you can customize various aspects of the Consul deployment, such as enabling TLS, adjusting replicas, defining service types, and more.